I needed to set a field value to a formatted date string in a map. As we are using BizTalk 2013R1 we are restricted to XSLT1.0 which makes date formatting more difficult (XSLT2.0 has better support for dates). However this got me thinking of the different ways this could be achieved. For demonstartion purposes lets say I have the below schema

the last three fields are the fields of interest and are set up with the data types as in this table
| Field | Data Type |
| ApprovedOn | xs:dateTime |
| CreatedDate | xs:date |
| CreatedTime | xs:time |
Setting the ApprovedOn field to the current datetime value is quite straight forward with a C# scripting functoid.

Setting the CreatedDate and CreatedTime fields can be done in a similar way and just requires a C# scripting functoid for each field that returns the date in the relevant format.
The CreatedDate C# scripting functoid
public string CurrentDate()
{
    return DateTime.Now.ToString("dd-MM-yyyy");
}
The CreatedTime C# scripting functoid
public string CurrentTime()
{
    return DateTime.Now.ToString("HH:mm:ss");
}
This is the result of testing the map with a valid input file.
<Employee>
  <ForeName>Percy</ForeName>
  <ApprovedOn>29/09/2016 11:59:43</ApprovedOn>
  <CreatedDate>29-09-2016</CreatedDate>
  <CreatedTime>11:59:43</CreatedTime>
</Employee>
Moving on to the orignal problem I was trying to solve
The destination schema contains an element which itself contains three child elements
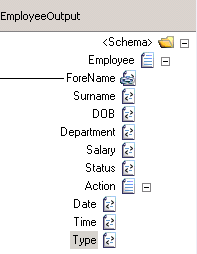
defined with the following data types
| Field | Data Type |
| Date | xs:date |
| Time | xs:time |
| Type | xs:string |
In the real life scenario the Type field is calculated from a number of fields in the source schema. To keep this example focused I have hard coded the Type field using a String Concatenate functoid. The output of the Concatenate is an input parameter to a scripting functoid that builds the Action destination element using an Xslt template. The value for the Type field could have been hardcoded in the scripting functoid but linking this way demonstrates parameter handling in an Xslt template.

So here we have a scripting funcoid (with the exclamation warning) containing inline C# code that consists of a singel FormatCurrentDateTime method. This method has a single string parameter which will format the returned string.
public string FormatCurrentDateTime(string format)
{
    return DateTime.Now.ToString(format);
}
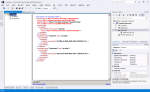
BizTalk adds the C# script in a block at the bottom of the xslt when the map is compiled. This can be seen by compiling the assembly containing maps, and using the Show all Files command in Visual Studio Solution Explorer to look at the corresponding .btm.cs file to see what has been added.
There is also a scripting functoid containing an xsl template. This template accepts a single parameter for the Type element. There are also two variables initialised by calling the FormatCurrentDateTime method passing in a string defining the format of the DATETIME returned. Note the use of userCSharp: prefix on the method call.
<xsl:template name="mapActionTemplate">
    <xsl:param name="type" />
    <xsl:variable name="date" select="userCSharp:FormatCurrentDateTime('yyyy-MM-dd')"/>
    <xsl:variable name="time" select="userCSharp:FormatCurrentDateTime('HH:mm:ss')"/>
        <xsl:element name="Action">
            <xsl:attribute name="Type">
                <xsl:value-of select="$type" />
            </xsl:attribute>
            <Date>
                <xsl:value-of select="$date" />
            </Date>
            <Time>
                <xsl:value-of select="$time" />
            </Time>
        </xsl:element>
</xsl:template>
For additional information on maps see this series of articles on Bizbert.
Credit to the original article:
Useful Cheat Code in Mapping (Calling C# code from XSLT) « BizTalk Server Tutorial


You must be logged in to post a comment.