This post is more about the technique rather than the scenario, so the solution is somewhat over engineered for what the scenario requires.
I generally create a separate Biztalk Server Project for Maps, Schemas, Orchestrations and Pipelines. Each project may then contain folders to group related content.
Environment:
Windows Server 2008 R2 Enterprise
Biztalk 2013 R1
Visual Studio 2012
MSSQL Server 2008 R2
Example Scenario
The HR department has moved the employee records to a new all singing all dancing record system as part of the HR phase 1 project. The payroll system is still in the legacy system and is being integrated with the new HR system in phase 2. Until then data relating to new employees must be exported from the new HR system and imported into the legacy payroll system. For this to work efficiently an automated process is preferred. So far the new HR system is configured to automatically create a file containing basic employee details each time a new employee is created.
Biztalk will form part of the process by moving the employee files to a specific folder, which folder the file is moved to will be controlled by a value contained in the XML file itself (Content Based Routing).
The XML file in this example is very simple. The value of the Department will determine which folder Biztalk routes the file to.
For the purpose of this example there are two files, one called Employee_HR.xml
<Employee>
    <ForeName>Percy</ForeName>
    <Surname>Philips</Surname>
    <DOB>1980-12-05</DOB>
    <Department>HR</Department>
</Employee>
and one called Employee_IT.xml
<Employee>
	<ForeName>John</ForeName>
	<Surname>Jones</Surname>
	<DOB>1980-12-05</DOB>
	<Department>IT</Department>
</Employee>
The new HR system places the files in the location E:\Test\Input\EmployeeDefinitions.
If you are following along copy the two XML definitions above in to files and save them on your computer so you can locate them later.
The requirements state that (we will look at this in greater detail later)
- If the employee department is HR the file should be placed in the E:\Test\Output\Employee_HR folder.
- If the employee department is IT the fiel should be placed in the E:\Test\Output\Employee_IT folder.
Solution Part 1 – Visual Studio
The first we need is the schema of the Employee Definition XML file.
- Open Visual Studio and open/create a project to hold the schemas we will be creating.
If a new project was created for this example make sure the the Application Name on the Deployment tab of the project properties is set. - Right-click the project in Solution Explorer and select Add then Add Generated Items… (If you prefer to use the main menu, on the Project menu, click Add Generated Items…)
- In the Add Generated Items dialog box, click Generate Schemas in the Templates section then click the Add button.
- In the Generate Schemas dialog select Well-Formed XML for the Document Type and for the Input File browse to and select one of the employee definition files you saved earlier. It does not matter which file as both have the same schema.If you see Well-Formed XML (Not Loaded) in the drop-down list, Microsoft suggests you continue and select the appropriate document type anyway, and you will be guided through the process of installing the missing DLL. Then repeat these steps.
For additional help see the post on Biztalk-Installing Schema Editor Extensions - Click OK once a file is selected.
If the schema generated successfully there will now be a schema file with a name similar to the file selected (different extension .xsd).

For parts of Biztalk to be able to read the value of the Department we need to set the department as a promoted property.
- Expand the Schema tree so the full schema is visible.
- Right-click the Department and in the context menu select Promote then Quick Promotion. Biztalk will inform that a new file is being added to the project and that the Employee schema has changed.
- You should see a new schema named something like PropertySchema.xsd.
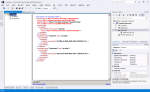
As Visual Studio has created the schema file it will contain the property that was just promoted and may even contain an default Property1 property which can be deleted. This is all we need to do in Visual Studio. The project can now be built and deployed.
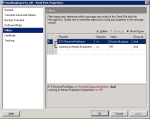
Solution Part 2 – Biztalk Server Administration Console
Looking back at the rules specifed above Biztalk needs to be able to receive a file from a location, process the file and save the file to a location.
Receiving a file from a location – Set up a Receive Port/Location
- Open Biztalk Server Administration
- Expand the console tree through the following nodes until you can see the application you want to create a receive port. In my case this is the Learning application.
- BizTalk Server Administration
- BizTalk Group
- Applications
- Right-click Receive Ports, point to New, and then click One-way Receive Port.
- Give the receive port a Name.
- In the left pane, click Receive Locations
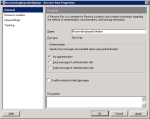
- In the Receive Locations panel click New
- In the Receive Location Properties window specify a Name of the Receive location.
- Select XMLReceive from the Receive pipeline drop down.

- In the Transport group, select FILE from the Type drop down and click Configure
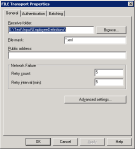
- In the FILE Transport Properties dialog, on the General tab, browse to the folder where the file will be picked up from. In this scenario it is the folder the new HR system is configured to automatically create a file containing basic employee details each time a new employee is created.
- Click OK on each dialog to return to the Receive Ports list.
Sending a file to a location – Set up a Send Port
Setting up a Send port is very much like setting up a Receive Location. First we set up where BizTalk will place the files for employees in the HR department. For HR employees the folder will be E:\Test\Output\HR and for IT employees it will be E:\Test\Output\IT. For you these location will probably be different.
- Right-click Send Ports, point to New, and then click Static One-way Send Port.
- In the Transport group, select FILE from the Type drop down and click Configure to open the FILE Transport Properties dialog.
- In the FILE Transport Properties dialog, on the General tab, browse to the Destination folder where the files for HR department will be placed, in my case E:\Test\Output\HR.
- Click OK.
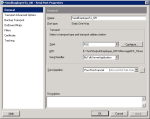
- Select Filters on the left navigation.
- Create 2 filters
- Property: BTS.ReceivePortName
Operator: ==
Value: ReceiveEmployeeDefinition - Property: Learning.Schemas.Employees.Department
Operator: ==
Value: HR
- Property: BTS.ReceivePortName
- Click OK.
To set up where BizTalk will place the files for employees in the IT department repeat the above steps. I set the Destination folder on the FILE Transport Properties dialog to be E:\Test\Output\IT. I set the filters for picking up the IT files as
- Property: BTS.ReceivePortName
Operator: ==
Value: ReceiveEmployeeDefinition - Property: Learning.Schemas.Employees.Department
Operator: ==
Value: IT
That should be it. Ensure the Receive Locations are Enabled and the Send Ports are started.
When a file is created in EmpoyeeDefinitions folder by the HR system Biztalk should pick it up and place a copy in either the HR or IT folder depending on the value of the department.
Things To Note
Are you familiar with the saying “There’s more than one way to skin a cat”, gross I know. Putting cats to one side there is certainly more than one way to create a schema or a promoted property.


You must be logged in to post a comment.